How to Set Administrator Account in Windows 10
Sometimes you need to use the built-in Windows 10 Administrator account: here's how.
Image: Nate Ralph/CNET
Windows 10 includes a built-in Administrator account that, by default, is hidden and disabled for security reasons. Sometimes, you need to perform a bit of Windows management or troubleshooting or make changes to your account that requires administrator access. For these reasons, you can enable the Administrator account and then disable it when you're finished.
SEE: Windows 10 power tips: Secret shortcuts to your favorite settings (TechRepublic Premium)
How to enable the Windows 10 Administrator account using the command prompt
Enabling the Administrator account using the command prompt is the quickest and easiest method.
- Open a command prompt as an administrator by typing cmd in the search field.
- From the results, right-click the entry for Command Prompt, and select Run as Administrator.
- At the command prompt, type net user administrator. The value for Account Active should say No (Figure A).
- Type net user administrator /active:yes. You should receive a response that the command completed successfully.
- Type net user administrator. The value for Account Active should now say Yes (Figure B).
Figure A
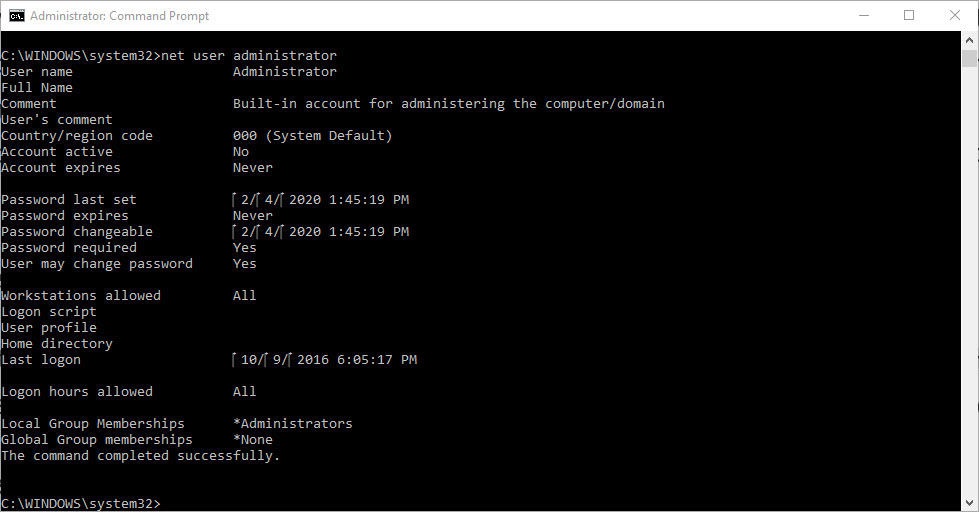
Figure B

How to enable the Windows 10 Administrator account through the user management tool
- Open Administrative Tools, either through the Start menu or through Control Panel.
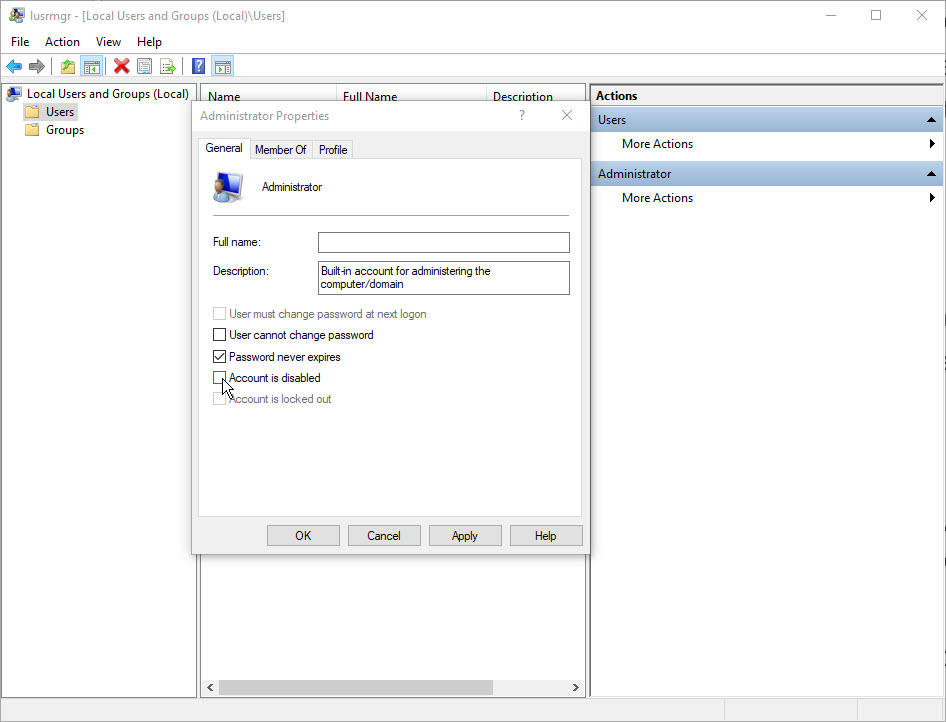
- Select the entry for Computer Management, and open the folder for Local Users And Groups. (A quicker way to get here is to type lusrmgr.msc in the Search field.)
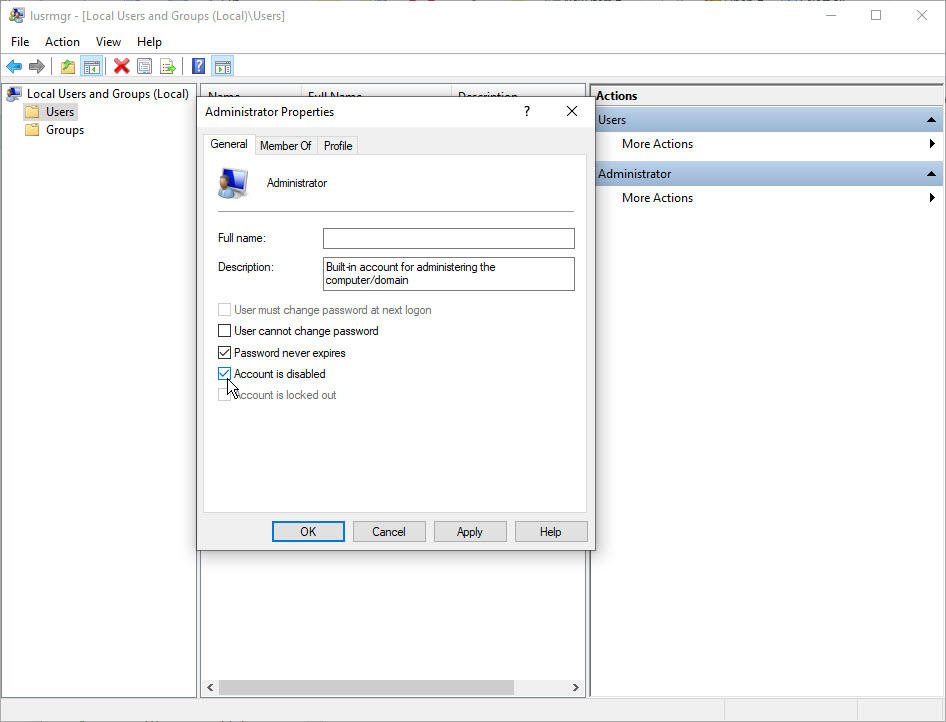
- Open the folder for Users, and double-click the Administrator account.
- Uncheck the option for Account Is Disabled, and click OK or Apply (Figure C).
- Close the User Management window.
- With the account enabled, log out.
- Go past the Lock screen, and sign in using the Administrator account. No password is required. You can then perform whatever management or troubleshooting you need to accomplish.
Figure C
SEE: The Internet of Wild Things: Technology and the battle against biodiversity loss and climate change (TechRepublic)
How to disable the Windows 10 Administrator account using the command prompt
When you've completed your management or troubleshooting tasks, you'll want to disable the Administrator account. To do so, follow these steps.
- Log out, and then log back in using your own account.
- Open a command prompt as an administrator, and type net user administrator to confirm that the account is active.
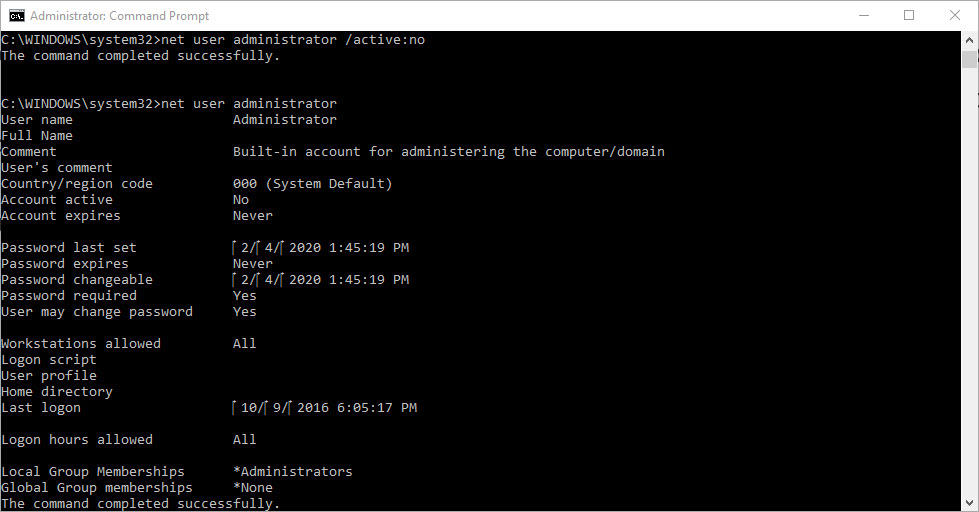
- Type net user administrator /active: no, then type net user administrator again to confirm that the account is now inactive (Figure D).
Figure D
How to disable the Windows 10 Administrator account through the user management tool
- Return to the Local Users And Groups window, and double-click the Administrator account.
- Check the box for Account Is Disabled.
- Click OK or Apply, and close the User Management window (Figure E).
Figure E

Microsoft Weekly Newsletter
Be your company's Microsoft insider by reading these Windows and Office tips, tricks, and cheat sheets. Delivered Mondays and Wednesdays
Sign up todayAlso see
- Can't activate Windows 10? Microsoft adds troubleshooter to resolve common complaints (TechRepublic)
- The end of Windows 7: Exit strategies and protection tips (free PDF) (TechRepublic)
- Windows 10 security: A guide for business leaders (TechRepublic Premium)
- Windows 10 how to: A free tech support and troubleshooting guide (ZDNet)
- Windows 10 1909: What do developers need to know? Not much, says Microsoft (ZDNet)
- 6 simple security changes all Windows 10 users need to make (CNET)
- How to clear storage space on your PC for Windows 10 updates (TechRepublic)
- How to use God Mode in Windows 10 (TechRepublic)
- Get more must-read Microsoft tips and news (TechRepublic on Flipboard)
How to Set Administrator Account in Windows 10
Source: https://www.techrepublic.com/article/how-to-enable-and-disable-the-administrator-account-in-windows-10/